October 29, 2013

Some Fun Etsy Finds of the Day

I was browsing through Etsy (like I do almost everyday...) and thought I would share my favorite finds. I have yet to update + renew my etsy shop...I will get it together soon. Promise. Browsing through everybody else's Etsy shops will hopefully motivate me to get going again with mine!

October 28, 2013

Lazy Day + Second Day Twisted Crown Natural Hair Style

This is my go-to lazy day style for when I want to "do" my hair...but don't have the time...Or for when my hair is too messy to wear out but it's not wash time yet.

You know your hair is looking crazy when you're about to go out on a Friday night and your friend who is going out with you asks you (in the politest way possible...) what you're going to do with that hair. 

Which is what happened to me on Friday. Lol. So...to save the mess of hair that was the result of going nearly an entire week wearing my hair in a bun--without touching it or doing it once...except to occasionally add more bobby pins to flyways...I spritzed it and put in curl formers. (You can see my curl formers on dry hair results that I posted a while back here). 

And that night it looked cute after taking out the curlformers--except the next day...after sleeping on it without wrapping it or twisting it...it looked crazy again. Like this:

Second Day Hair I Started With:

So to salvage the look so I wouldn't have to wash it...I did my go-to lazy hair day style. I'm not sure what to call it...but it's basically purposefully messy french braids + a braided bang. Except instead of braids, I did two strand flat twists. I am not good at braiding at all, but this style is meant to look kind of messy-cute and effortless which is why it works for people like me who can not braid for their life. 

Tutorial:
First, loosely side part your hair and continue the part all the way down into two halves (it's ok if they're uneven). You don't need a perfect part, just part your hair loosely with your fingers. Then, start with a small strand of hair on the lesser side of the side-part and flat twist all the way down to the back of your neck picking up strands of hair as you go. Secure the twist with a clip. 
Then, you'll want to pull all of your bangs forward. Start with a small strand of hair and twist loosely while pulling the hair down your forehead a bit to create a bang. If you don't want bangs, you can twist closer to your scalp. 
Keep twisting and picking up strands all the way around until you reach the back of your neck and meet the end of the first twist. Then take out the clip and twist the two ends together. Roll the twisted ends up and tuck the hair into itself. Pin the ends in place with a few bobby pins. 
To give the style a more messy carefree look, pull out a few small curls around your ears and neck. To make the bangs fuller, I pull apart some of the twists along my forehead and bobby pin them down as needed. If some of the hairs on the crown of your head didn't make the twists, you can also tuck in loose strands into the twists and pin them in place. 

The Result: 
(Front and back)
I like this style because it's a good solution for crazy second or third (or fourth...) day hair when you don't just want to put it in a bun. It takes 5-10 minutes to do and it's totally ok if it's messy (or if you can't braid).

October 27, 2013

Latidoe Apron Featured in a WellnessMats Ad in the New York Times! #AlmostFamous


This is kind of cool! Too bad my etsy store is down at the moment. I will have to update it and post all my aprons up -- and everything else I have ready made. Especially now that the holidays are coming up...one of many things on my to do list this week: update store. Now. 

And if you stand in kitchens a lot...I recommend looking into WellnessMats here

October 26, 2013

My Clear Skin Facial Regimen for Under $30


These are all of the (inexpensive) products that I use on a regular basis on my face -- and that actually help keep my skin moisturized and clear. I like to keep things minimal and simple so I rarely splurge on facial products -- though I don't mind to every now and then. I just find that oftentimes, when I do splurge on more expensive fancy products, that they don't really work all that much better (if at all better) than the less expensive products.

My Day Routine:

In the morning, I wash my face with the Neutrogena facial bar and then moisturize generously with Trader Joe's Enrich. I don't use the toner very often...but if you have dark spots then I'd suggest using the ACV toner daily. You can also make your own toner using diluted Apple Cider Vinegar. I like the Terra Cotta Paste ACV Toner by Leanne R. Designs because it's already diluted and smells way better than regular ACV because she adds a bit of oils. 

My Night Routine:

At night, I wash my face with the Neutrogena facial bar and then moisturize lightly with the Trader Joe's Enrich facial lotion. I then use the CVS brand Benzoyl Peroxide (because it has the same amount of concentration of the active ingredient but is cheaper than Clean + Clear or other brand names...) and smooth it over the problem areas of my face. This stuff dries out your skin, so if you have dry skin use sparingly only on affected areas. If you have oily skin you can get away with applying a thin layer lightly over the entire face. I apply it based on how dry my skin is. I only use this at night.

Once or Twice a Week:

Only once or twice a week I may exfoliate using either a scrub or a mask. Lately I've been using the Moroccan Red Clay because it feels a bit more luxurious -- ha. But a scrub works fine as well. I like the St. Ives scrub because it has acne fighting properties while also being gentle and smelling nice. 

October 24, 2013

DIY Baby Peter Pan Costume

Today I helped my cousin make this DIY Peter Pan costume for her baby/my baby cousin. Complete with the feather-in-hat, belt, and sword. Just add tights. It's not totally finished yet...and baby has yet to try it on...but so far so cute!

We got the pattern idea from Make It & Love It. We didn't stick to her pattern exactly...and probably used a little bit less effort...(ours is sew-less, and involves hot glue)...but I think it was a success. No idea what I'll be...but at least baby does.

October 21, 2013

Jo Malone London Unisex Cologne Five Piece Gift Set


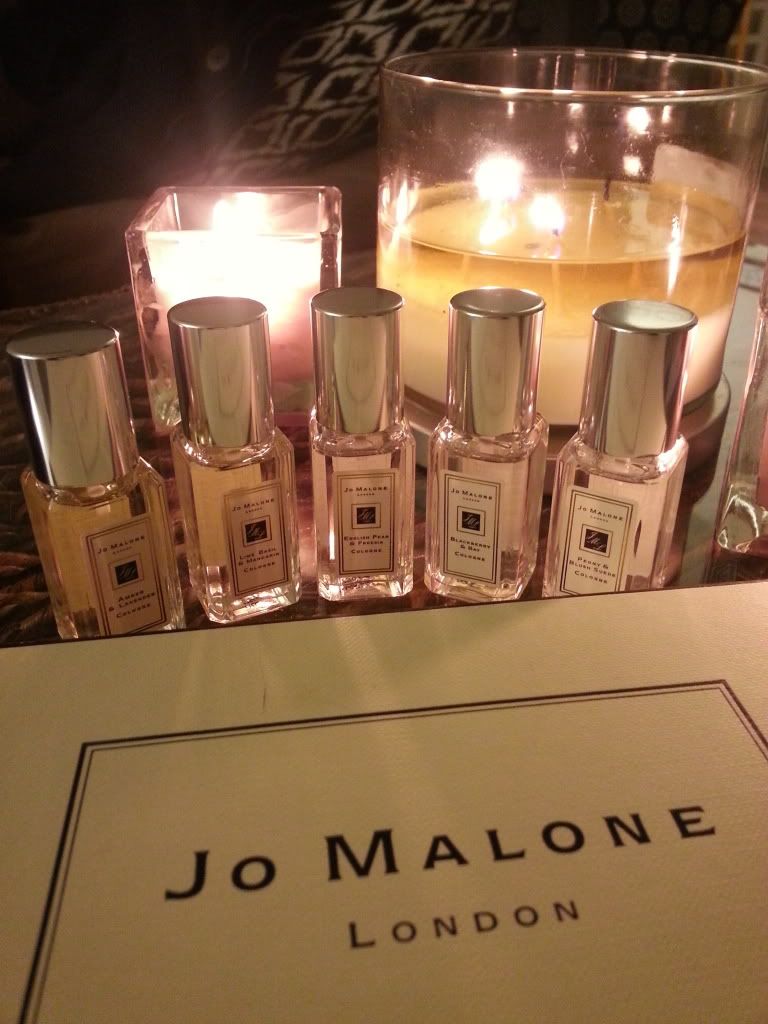
This was a spontaneous buy...and I really like it! I like the whole line of Jo Malone fragrances in general because they are simplistic but interesting and are made for layering. Mixing and matching is always fun because you get more options and I also like that most of the fragrances are meant to be unisex. My boyfriend and I actually bought this together and plan on sharing it...haha.

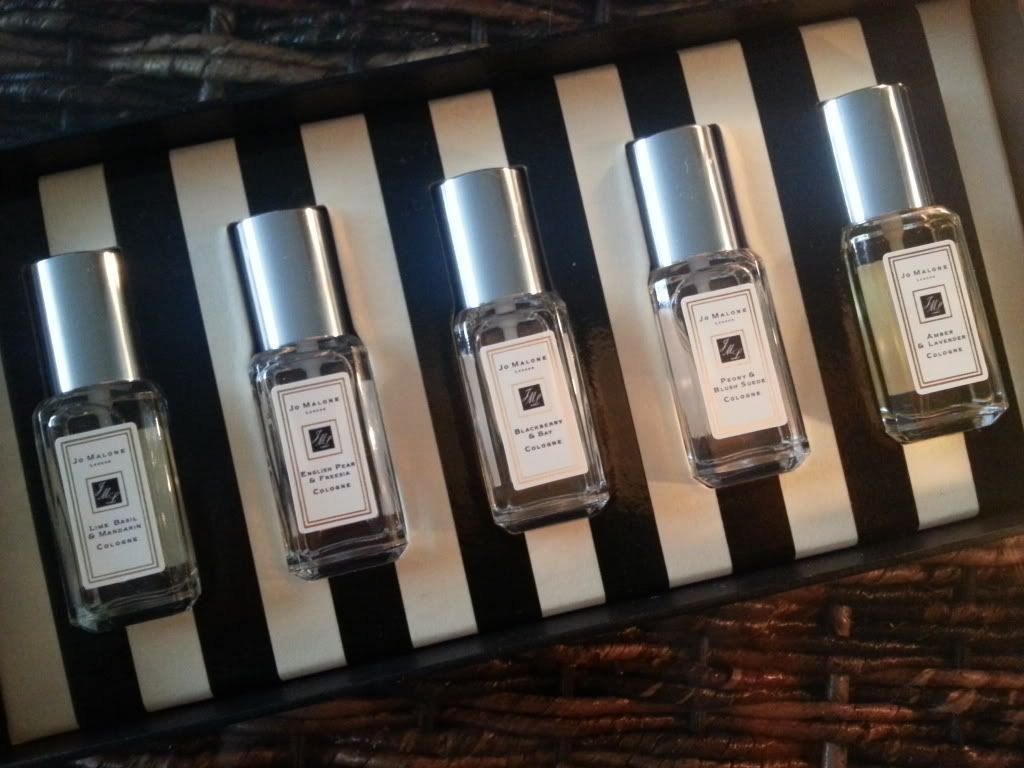
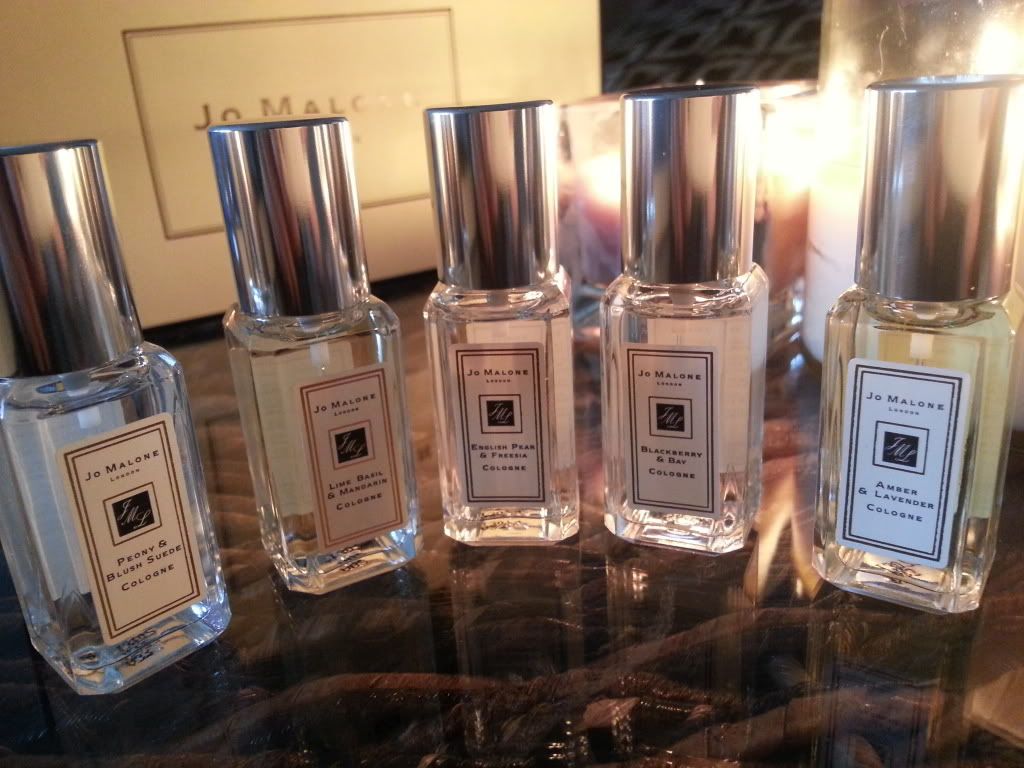
This set comes with five 0.3oz bottles of assorted colognes -- I think all of which are top sellers. The box includes: Amber & Lavender, Lime Basil & Mandarin, English Pear & Freesia, Blackberry & Bay, and Peony & Blush Suede and was $100 + tax (with the help of a couple gift cards...).  


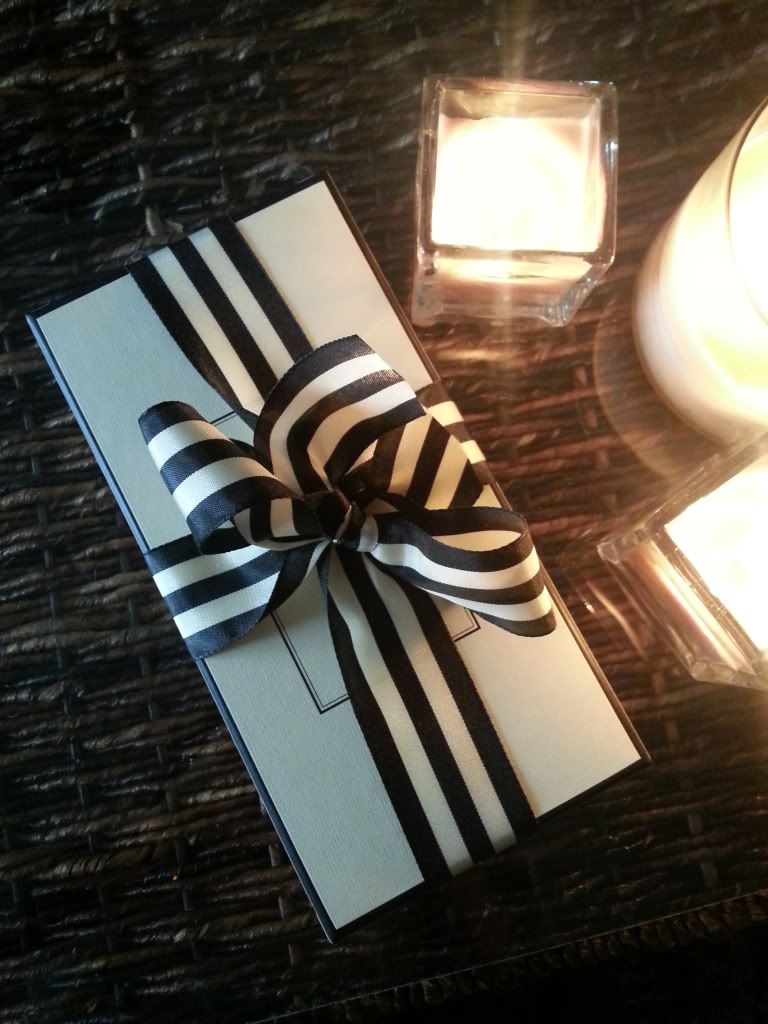
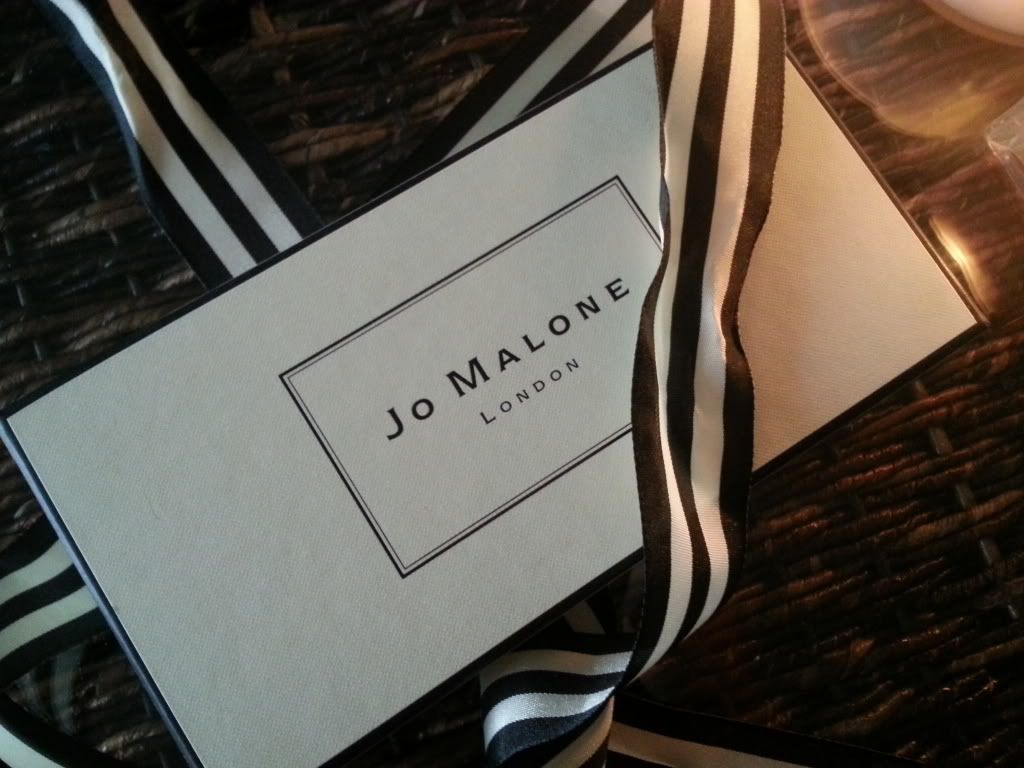
As you can see, the packaging is super cute. Which makes sense...as it's supposed to be a gift set. It was hard to open the box...lol. I also like the look and feel of the bottles themselves -- very minimal and fitting to both men and women.


The Fragrances:

I am in no way a cologne expert...I looked up information on the notes from fragrantica.com:


Amber & Lavender
Notes: bergamot, lavender, mint, lily-of-the-valley, clove, cinnamon, myrrh, patchouli, amber

This one is my favorites (along with Lime Basil & Mandarin). It still passes as unisex, but does have more of a masculine feel to it -- it was made for Jo Malone's husband. I can definitely smell the amber in it -- it's a bit darker and heavier of a scent then the others and smells very distinct.


Lime Basil & Mandarin
Notes: lime, mandarin orange, bergamot, basil, lilac, iris, thyme, patchouli, vetiver

I think this is the most unique scent of this set. Even though it has a fruitiness to it, I think the basil adds an earthiness that tones down the fruitiness a lot. It's my favorite of the set next to Amber & lavender and I think this one is a tiny bit more on the masculine side but still very appropriate for women -- it just not "girly". 


English Pear & Freesia
Notes: freesia, pear, quince, wild rose, rhubarb, patchouli, amber, white musk

This cologne was one of my boyfriend's favorites. It's very fresh and a mix of floral and fruity but I think mostly floral. This one is a bit more feminine than masculine I would say and also one of the lighter scents -- a bit summery. 


Blackberry & Bay
Notes: grapefruit, floral, vetiver, cedar, blackberry, bay leaf

This one was also one of the boyfriend's favorites. To me, it was the darkest of all the fragrances in the set. Probably because of the blackberry. If deep purple had a smell...this might be it. Lol. I think this one would also be a good one to layer--especially if you wanted to town down a fruitier, lighter scent. 


Peony & Blush Suede
Notes: red apple, peony, jasmine, carnation, rose, suede

I feel like compared to the other fragrances, this one is the most classic. I think it's good for most occasions and is very feminine and floral. It's a very pretty, light, and happy scent. I think a lot of lines have a fragrance somewhat like this one. 

October 19, 2013

DIY Pumpkin Brown Sugar Scrub


I'm obsessed with pumpkin everything. So naturally...the minute pumpkin comes back in season every October...I go a little crazy and buy as much pumpkin-everything I can find as possible. I also enjoy making everything and anything pumpkin as well...

Last night I made a pumpkin scrub -- it smells delicious (and I didn't taste it...but since all it is is sugar + pumpkin...I'm sure it taste good, too). 

I used a light brown sugar so the granules are small enough and gentle enough to use on your face...but this scrub is also good for body, hands and feet as well.


You will need:

One part pure pumpkin puree
One part safflower oil
Two-three parts light brown sugar (depending on how coarse you want it)


Mix the oil, pumpkin and sugar until the mixture is consistent and store in a jar. Use to exfoliate rough skin, feet and hands! And enjoy the sugar scent of brown sugar + pumpkin...yum.

October 17, 2013

Blonde Natural Hair: Should I Do It?

pinterest.com

I haven't done anything new with my hair in a long time. Thinking about it, I haven't even done my hair in a long time. And after a tragic experience at a hair salon several months ago...I probably won't be getting any new interesting hair cuts any time soon.

I'm not afraid of experimenting with color though...I thought about doing a dark cobalt blue. But I think that might get old fast. I'm thinking about going blonde! Like one of the lovely looks above...my hair length is different than all of these that I've found that I like...but I love the look of a gradient. I want it to grow out looking decent. Not trying to get a touch up every month. 

I think I may wait until the new year...but with holidays coming up...and all the reasons to be festive...it might be hard to fight the urge to call up a salon soon! 

Should I do it?

October 15, 2013

My New (But Soon to Be Old) Apartment

Throw pillows, Target
Patio couch, on sale at Target
Wicker storage table, Target
Wall art, an original pen & ink from my great aunt + inspiration
Over-sized floor pillow, DIY

It doesn't seem like it's actually happening. But I'm more than likely buying a house in less than ten days. Which means this new apartment will soon be an old apartment. It was a six month lease, but these six months are going by so ridiculously fast. When did I become an adult kind of? I don't know.

I never got around to putting the finishing touches on the apartment I'm in now...but since I'm moving soon I figure I will wait to make/buy wall art and the like until I end up somewhere I plan on staying in for longer than six months. I feel like I'm always moving...I've lived in four different places (not including my home in Jersey) and two different states in the past four years. Hopefully I'll get to enjoy my next home for at least a couple of years. 

Anyway...I thought I would share the set up of where I live now. It's pretty small...just one bedroom and a small living area. But it's perfect for just me and Sam (cat). I tried to stay very minimal with furniture as you will see...so it doesn't feel cramped at all. I also put this apartment together on a budget...you'll notice half of my things are either DIY, partially DIY, or from Target. 

The only things I think are missing from this apartment...would be a wood floor, curtains, wall art and maybe a dresser or bed frame in my bedroom. 

DIY succulent centerpiece, plants from Home Depot, vase from Michael's


Small book shelf, Pier One Imports
Buddha book ends, Pier One Imports
Reupholstered stools, stools on clearance at Target, fabric from Joan Fabrics

Aprons, the rejects from my Latidoe shop
Table, I built
Tablecloth, Target
Chairs, repainted unfinished wood chairs from Ikea

Rug, Target
Painting, an original acrylic of mine from 2008

Rug, a Persian inherited from my Grandma
Trunk, recovered a trunk from Salvation Army

Shower curtain, Meijer (I think...)
Bamboo bath shelf, Ikea
Wicker baskets, Bath & Body Works + Target

Samedi (aka Samson) the cat, for free


October 14, 2013

No Bake Birthday Cake Oreo Truffles


I don't like to tell people what is in these, otherwise they usually don't want to eat them. But I promise you, they are delicious. 

If you are on a diet, I advise you to pretend you're not. All these are are balls of cream cheese + crushed oreos. So while they might not be good for you...they are good for your soul. And a perfect last minute party treat to throw together and impress.

You will need:

Whole box of birthday cake oreos

Whole block of cream cheese

Sprinkles (or any other topping)

Directions:

Break oreos into small peices and then mash until the oreos are fairly powdery

Stir in the softened cream cheese until entire mixture is uniform (or you can leave it a bit chunky for texture)

Use a spoon to scoop bite sized portions. Dip one side in sprinkles. Chill in the fridge for 30 minutes to an hour. Serve chilled. Enjoy!

<3

October 13, 2013

16 Tips From Influential DIY Bloggers You Should Know


Click on the image above 
to check out Latidoe featured on Eve of Reduction

Eve touches based with a handful of DIY bloggers for a list of 16 tips for DIY home projects. There's a lot of good advice on here very much worth looking into :)

<3 

October 9, 2013

Detoxifying Moroccan Red Clay Face Mask


Not too long ago, I picked up a jar of Moroccan Red Clay Powder -- I'm sure there are multiple brands that sell this. I just chose this brand because it was what they had and happened to catch my eye on the shelf. I bought it from a natural grocery store in Ferndale. I love going in there to browse. 

I like clay masks because clay is naturally absorbent meaning it makes a great detox to free your skin (and hair...) of any impurities by absorbing the bad stuff. Next time I want to try a hair mask...

Benefits of Moroccan Red Clay:
  • absorbs impurities + cleanses
  • moisturizes
  • helps protect skin from damage
  • soothes 
  • tones, evens + balances 
  • improves texture
  • helps control acne
  • safe for sensitive skin


Moroccan Red Clay Mask: 
  • 1-2 tsp Moroccan red clay powder
  • 1 tsp water (distilled works best)
  • 1-2 drops of your favorite soothing and/or aromatic essential oil (optional)

This is basic...just blend until you have a creamy paste and apply to face and/or neck (avoid your eyes...).  Funny, I don't think this is meant to smell good, as you can see in the ingredients there are no added fragrances but I actually like how this smells as is. It's a subtle, sweet and earthy scent. 


Allow to dry completely around 10-15 minutes. If it starts itching, don't torture yourself. Just wash it off early. You may experience some redness depending on how sensitive your skin is and how long you leave it to dry. If you have sensitive skin, I suggest mixing a more watery mixture to reduce drying time. Either way, the redness should disappear back to normal shortly. What you will look like:


What do you think of Moroccan Red Clay?

<3

October 7, 2013

Delicious Dark and Stormy + Lychee Gimlet Cocktails


Of course football Saturdays with my friend and vlogger Rita from The Rita Way would be nothing short of Booji. Instead of watching the University of Michigan vs. Minnesota game, (which we won!) we drove to Plum Market and picked up ginger beer, lychee fruit, and sea food appetizers for a mini cocktail party -- for two.

We made our own versions of the classics dark & stormy and gin gimlet. They were both delicious! And perfect for our girls night in. And luckily...we remembered our recipes:


Dark & Stormy:

2 oz. The Kraken black spiced rum
3 oz. Fever Tree ginger beer (currently on sale at Plum Market)
0.5 oz fresh squeezed lime juice (about a little less than a quarter lime) 


Lychee Gimlet:

2 oz. gin
0.5 oz fresh squeezed lime juice
0.5 oz lychee juice (we used the juice from a can of lychee fruit)
1 oz St. Saint Germain Elderflower Liqueur 


To measure, I used my new bartending tool...it's basically 10 utensils in one. Rita gave it to me for a birthday present. I don't have a bar set up yet. But when I do...it will have a permanent home. :) We paired our fancy cocktails with equally fancy brie, toasted baguette, and smoke salmon with cracked peppercorns along with shrimp cocktail. 

To enjoy the Dark & Stormy, you have to like ginger. In all forms. Including liquid. It's delicious--with a strong spicy kick that makes it fun + interesting. I also loved the lychee + elderflower liquor combo. I love floral flavors in general and whenever I see or eat lychee, it immediately brings me back to Thailand. I never tried lychee fruit until I traveled there where they were super popular and cheap. We probably ate them everyday fresh from the local markets wherever we roamed. So naturally, I enjoyed the lychee gimlet just as much. Yum...

<3