December 15, 2013

DIY Bay Window Curtains


The house has been an ongoing project--interrupted by three days straight of making Christmas cookies--but other than cookies, pretty much all I've been working on (or rather...all I've had time to work on) is house stuff. And it's been fun! Just very, very busy.

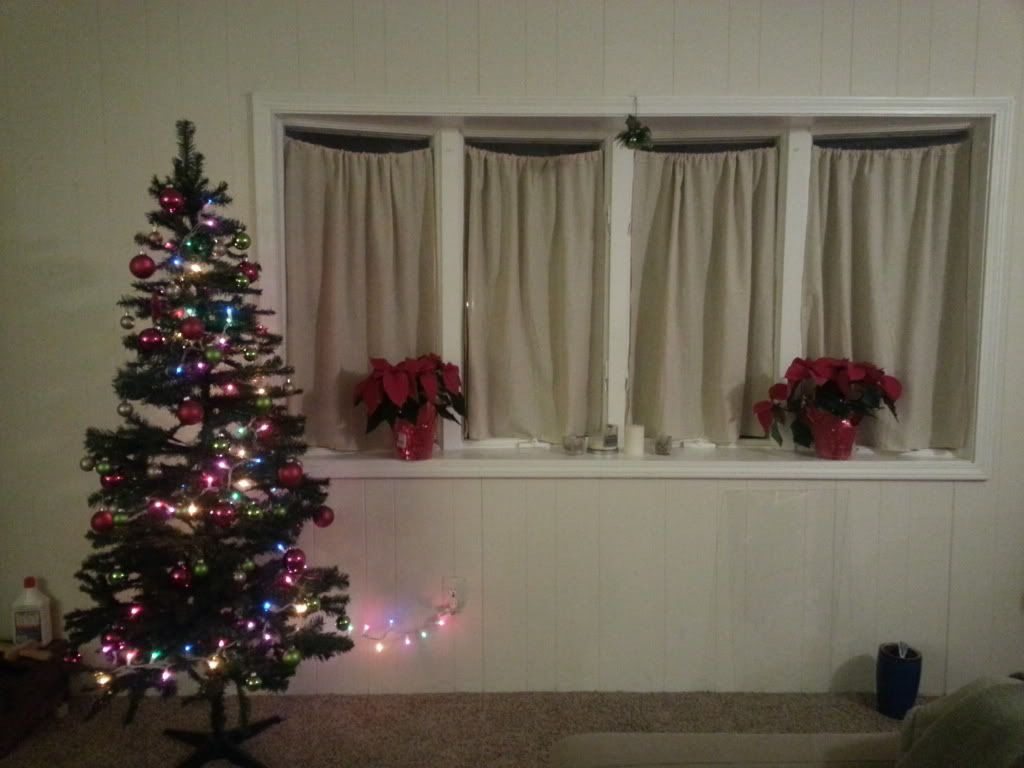
One of our priorities was cover all windows. So we had blankets and sheets up for a while and then gradually bought blinds and drapes. We couldn't find the right size blinds for this bay window in the family room -- so I just made them. Curtains are super easy... just an over-sized rectangle, so it only took a few hours. It actually would have taken less time if I wasn't having issues with my sewing machine...it was a little dusty.

The How To:

First thing's first -- measure the windows. For each window pane, you'll need a cut of fabric that is 5 inches + the height of the pane long and the width of the pane + half wide. (If you're using a fabric that you want to be very billowy, then double the width). Just for example, if you're window pane is 6x10" then you'll need a cut of fabric that is 9x15" (6+3 by 10+5). 

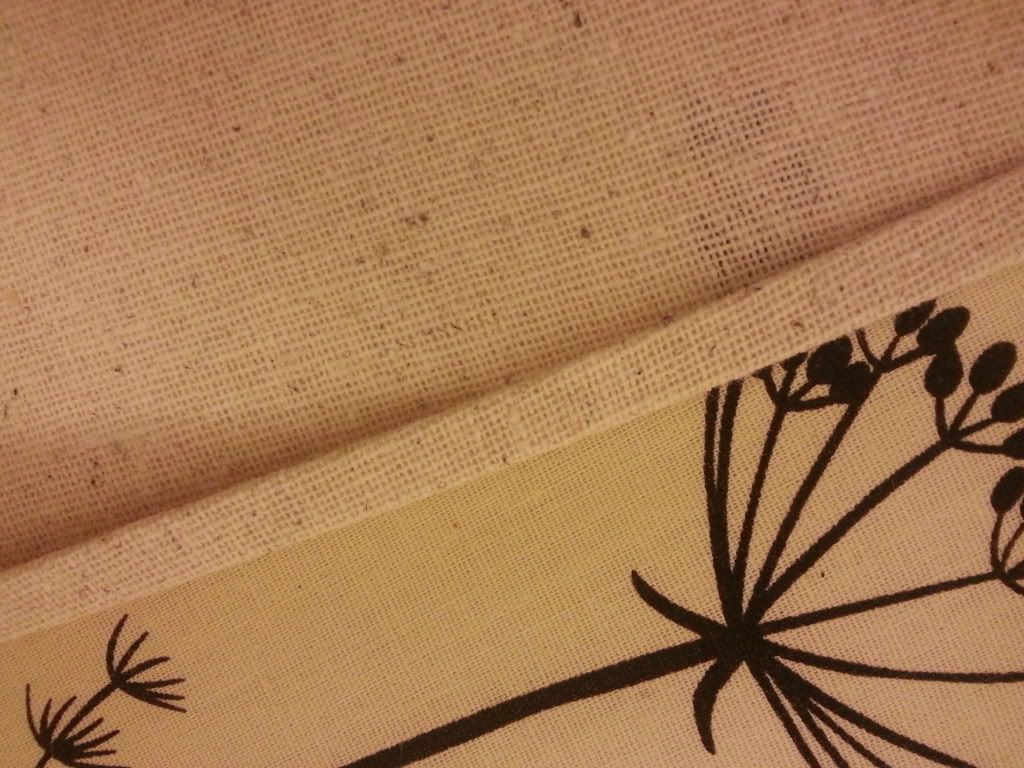
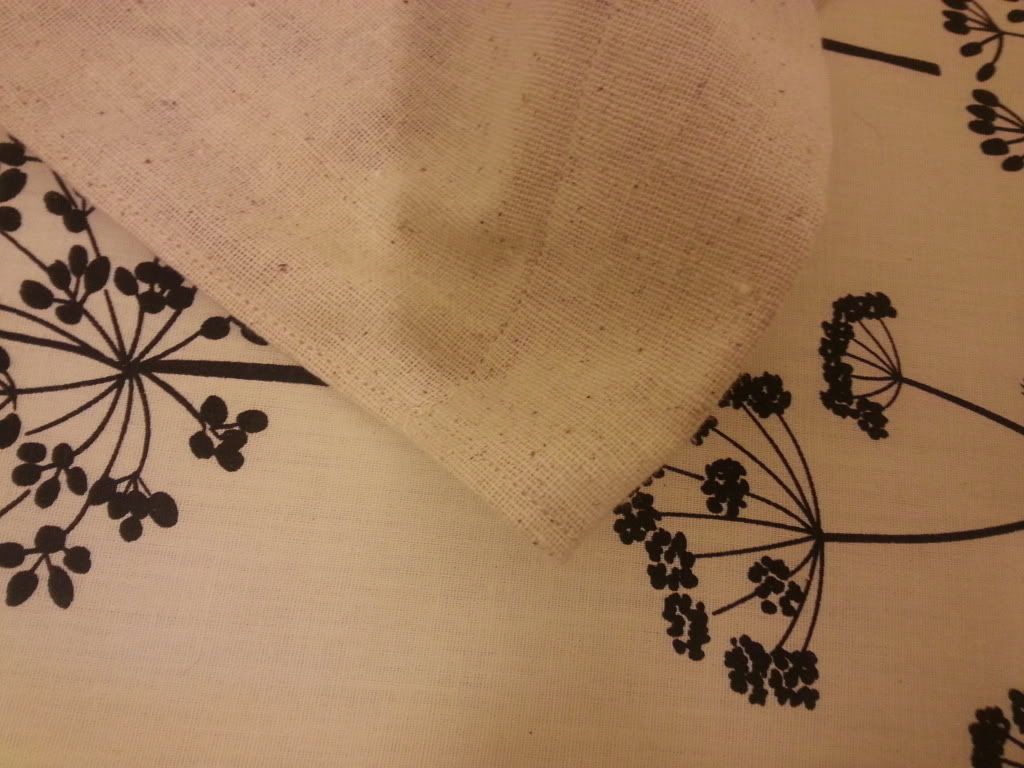
When shopping for fabrics, you'll need to find a fabric that is wide enough to cover 1.5 of each pane. I ended up using 4 yards which I cut into 4 equal cuts per pane. The width of each panel may have been slightly more or less 1.5 the width of each pane -- but it doesn't have to be exact so long as you have enough to create billows and enough for folds/seams which take away about an inch off every side. 
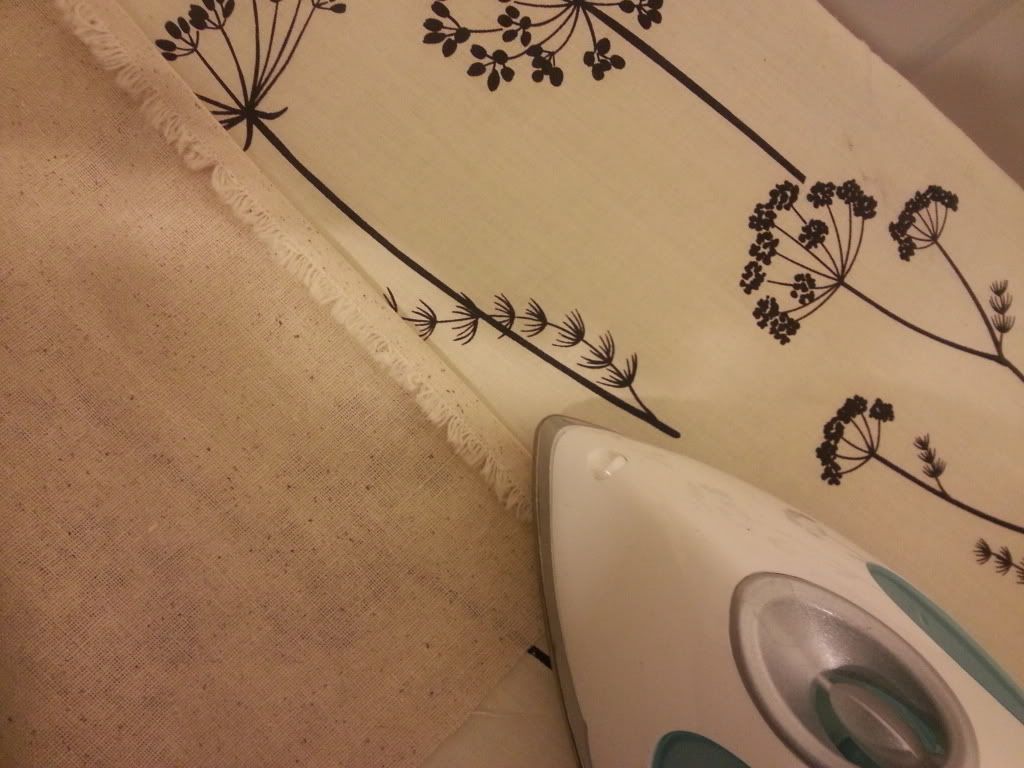
To avoid fraying at the ends, you'll need to fold each edge over twice and iron to stay in place for sewing. If you have a serger, you can serge all of the edges so you only have to fold once. I left my serger in NJ, so I just double folded. Either way is fine and takes around the same time, I'd say.
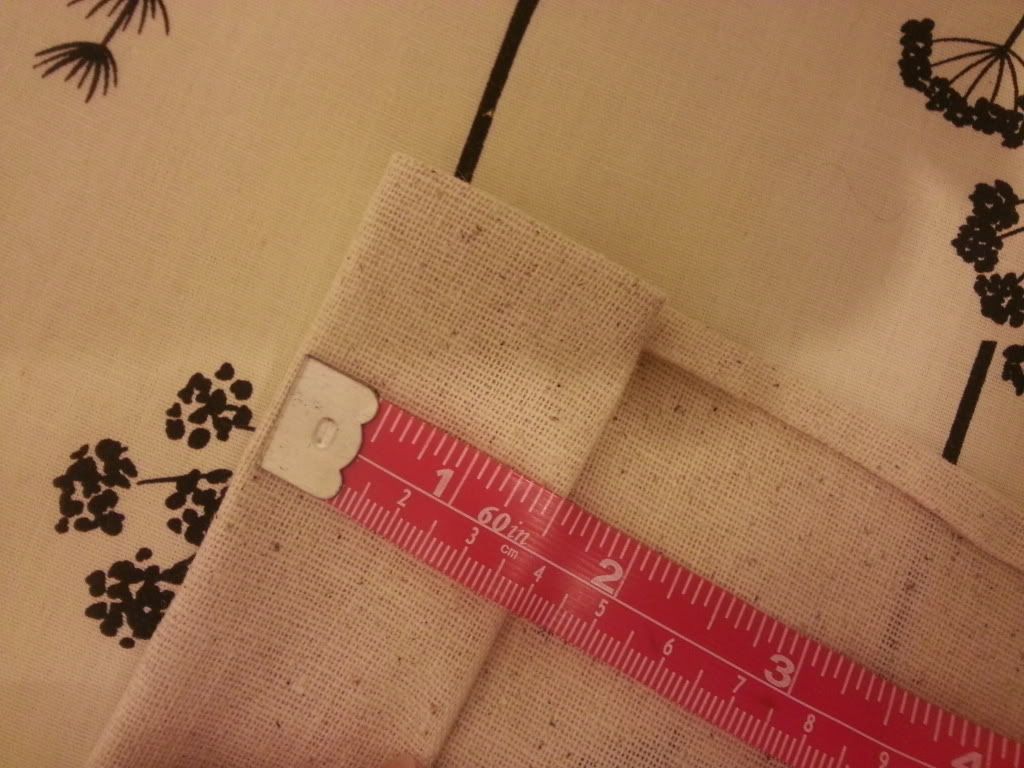
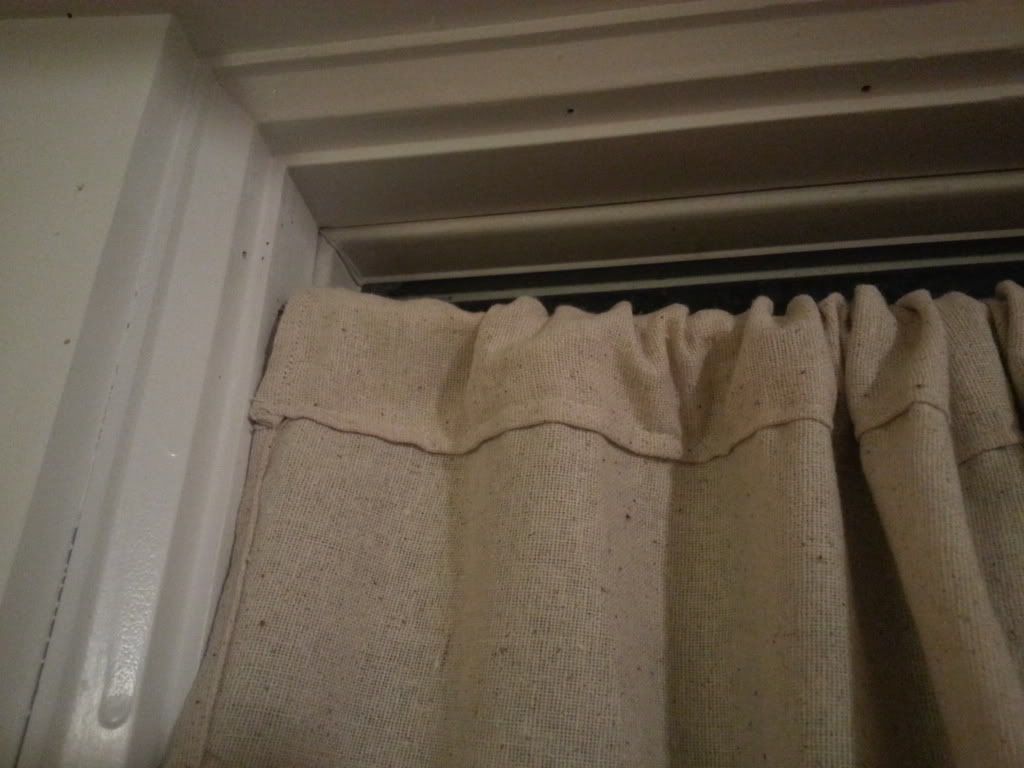
Once you've folded and ironed about half inch (or less) along all four sides, fold down about 1.5 inches along the top width. This will be where you can feed the curtain rod (you can use dowel rods or string -- we used string). Iron in place. When all the edges are ironed in place, double check the measurement of the window to be sure your panel is long enough. (It doesn't need to reach the tippy top of the pane because you'll have to install a rod for it to hang from). When fitted, sew along the edges -- and make sure not to sew shut the opening for the curtain rods/string!
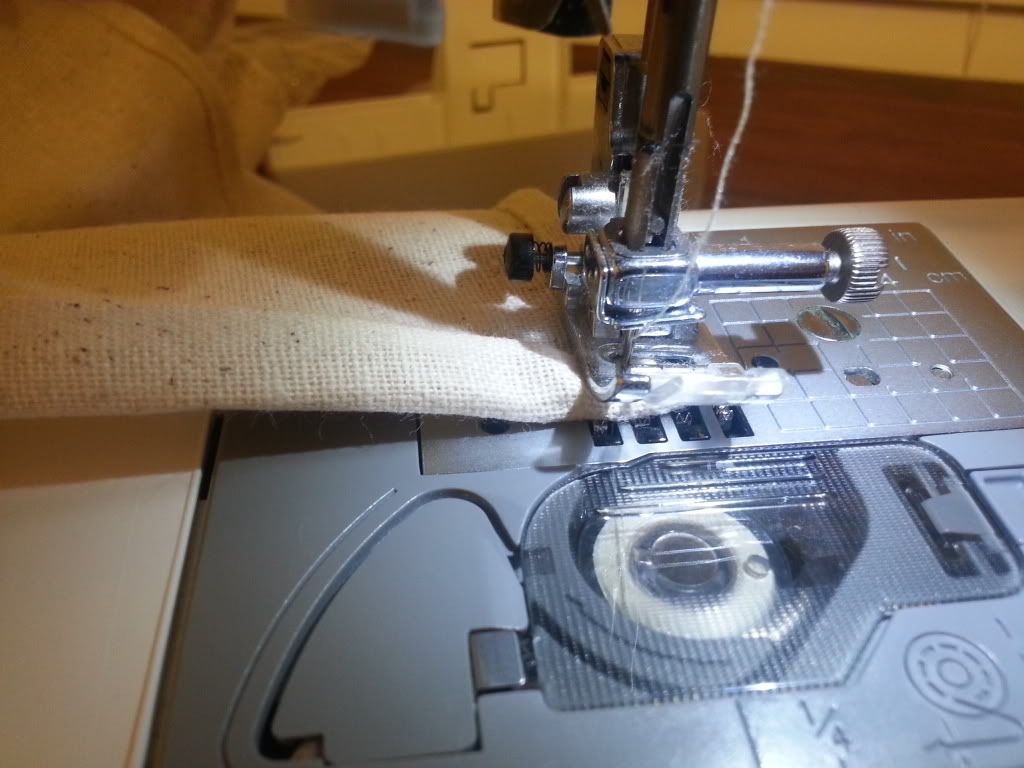
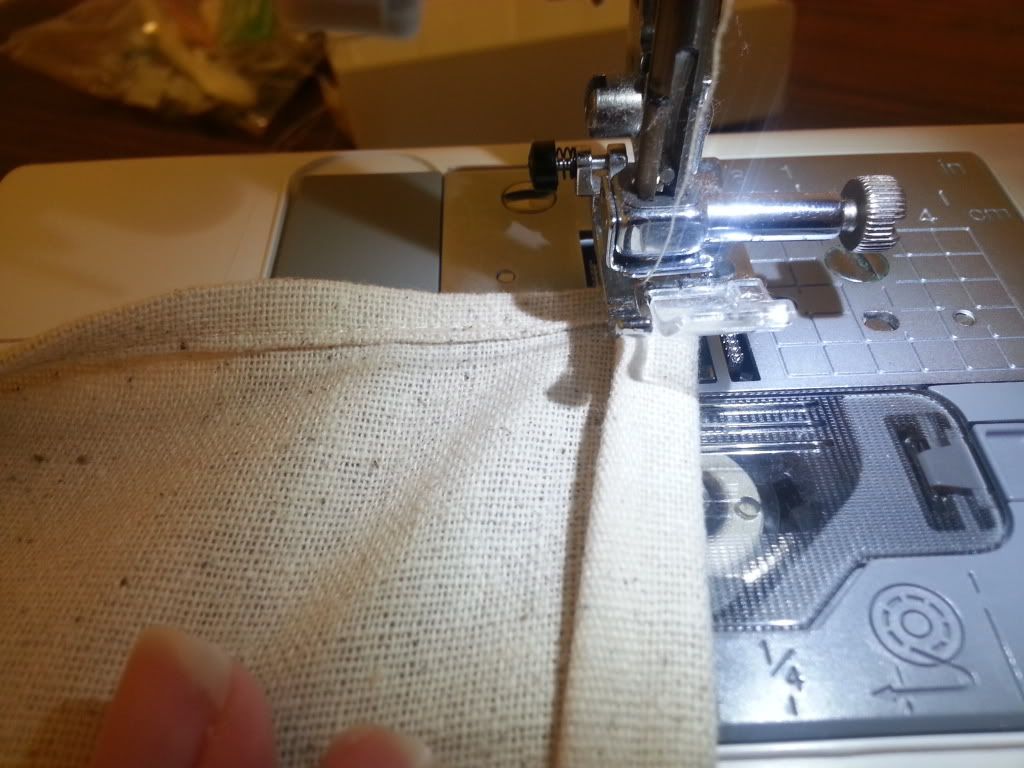
To sew seamless corners, use the pivoting method. Simply sew up to the corner (slowly so you don't pass it). When you get very close to the corner, hand spin the machine using the hand wheel until the needle is right at the corner. Leave the needle down, lift the foot lever up, spin the fabric to face the direction you need to go, lower the foot lever, make the first few stitches with the hand wheel to make sure everything is smooth, then sew with the pedal as normal. This will give you a clean sharp corner. If that sounds confusing, click here for a visual tutorial.
To avoid sewing the openings shut, unfold the 1.5" fold and start the stitch at the top corner going straight down. After sewing along the first side, bottom, and then other side (pivoting at each bottom corner), then end the stitching. To sew the top edge, fold the 1.5" fold along the top down, and sew along that edge (not worrying about pivoting the two top corners). I used a cream colored thread to match so it's hard to see the stitch work -- but if you look closely you can see the holes.
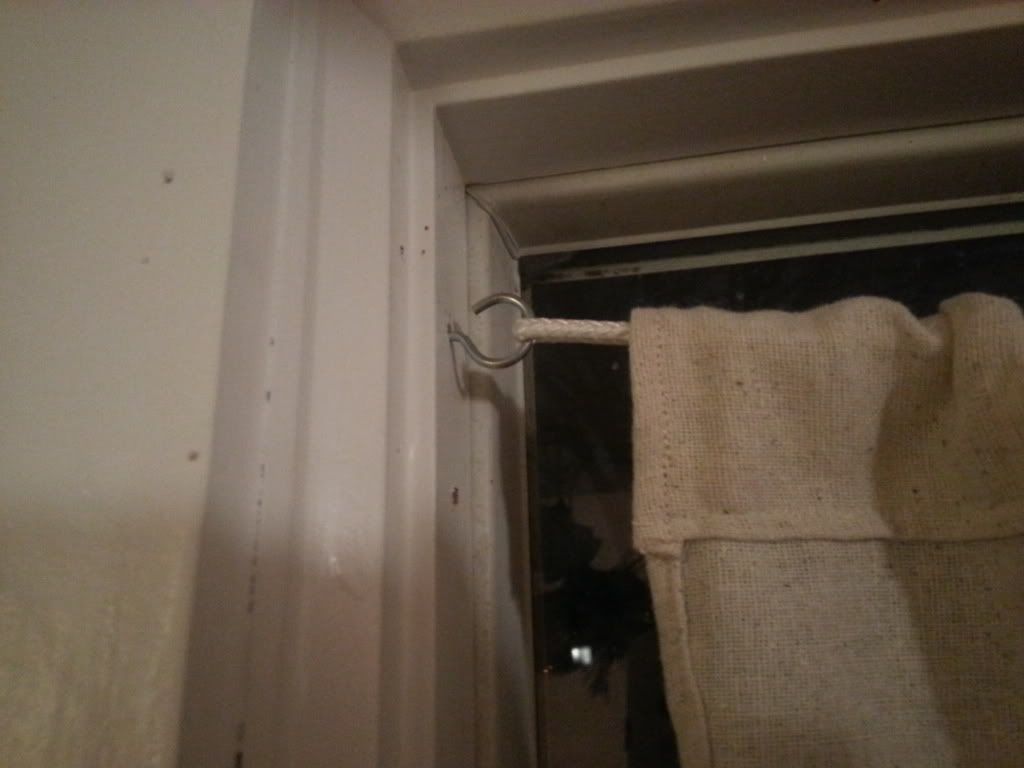
To install, the BF drilled small holes on the interior of the wooden window frame, then inserted small hooks. We just strung the rope through, pulled taut and tied a knot, tucking the knot inside the curtain opening so not to be visible. To hide the rope and the hook, just slide the curtain over it all. (He put the curtains up backwards because he likes how the seams look -- so I let him. Otherwise, you would normally flip it so the seams face outside). 
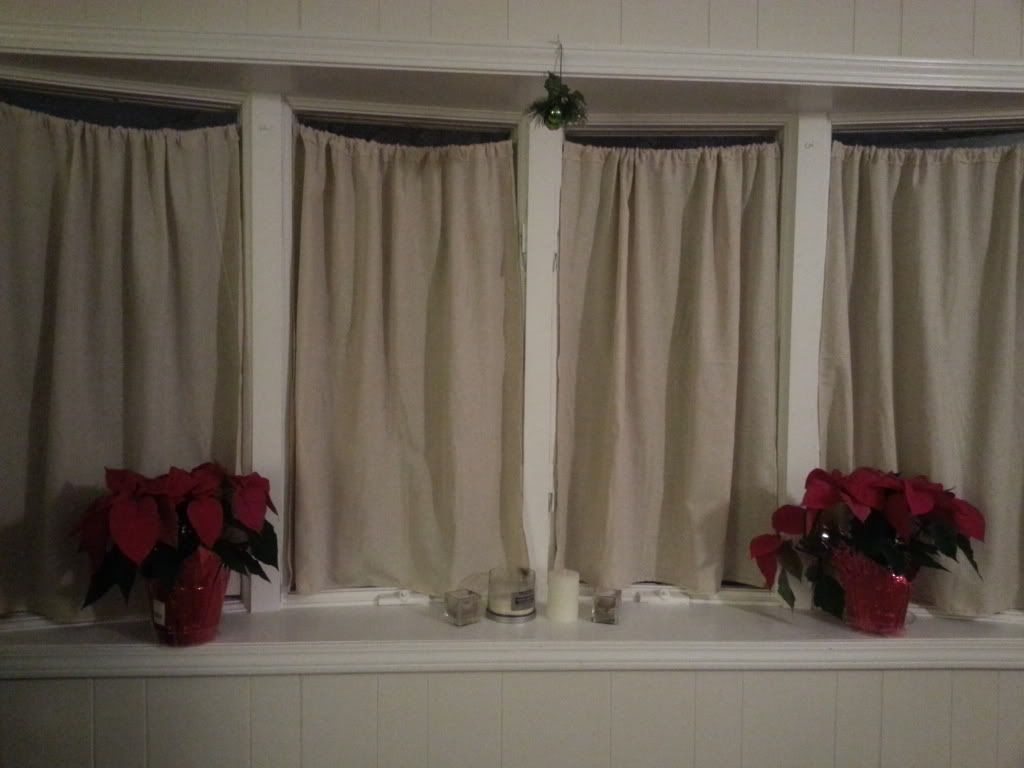
And here's the final result! Nothing fancy or difficult to make/install. To look more legit, I'd suggest using a dowel rod. But I like the way the rope hangs a bit and isn't perfectly straight. Maybe later I'll get more creative with the fabric choice (we chose a cotton/linen looking fabric that was cheap -- $5 a yard -- and opaque enough for privacy, but didn't venture into patterns/colors). Maybe I'll do that for the dining room window -- which is currently being covered up with a bed sheet. Haha. 

Including fabric, thread, hooks, and rope the total cost amounted to under $30.

November 18, 2013

Some Before Pics of My New House

This is it. Like I said, a modest small house around 1,300 square feet. It's like a doll house--but for people. I don't even think I'm half way done packing...it's daunting. Moving is a hassle but I know it will be worth it once it's all over. We've already had some fun picking out curtain + blinds and the less interesting things. So it should only get more fun. There will be after pictures soon...
The backyard
Living room + front entrance
Living room -- with accent painted brick wall

November 14, 2013

Floorplan of My Teeny Tiny New Home

I finally closed on my house and picked up the key yesterday...which means I am officially a homeowner. Which also means my life will officially be swamped with home improvement projects...my favorite :) Which also means that there's a good chance a portion of this blog will now feature blurbs about my latest DIY home projects. 

This is a floor plan I made on Floor Planner (smallblueprinter.com) -- it's not as accurately precise as possible, but it's good enough for practical purposes + spacial planning. 

It's a small 1940's home with 3 bedrooms (one of which I'll turn into an office), two bathrooms (one in basement) and a cute backyard. There's also a basement which I didn't include in the blueprint. The master bedroom is upstairs which is kind of  neat because the bedroom has the whole floor to itself and is spacious, but there's no bathroom up there. Which is a bit of an inconvenience, but I figure eventually it shouldn't be too hard to install a half bath at least. 

I'll post up pictures of the actual house soon!

November 10, 2013

Twist Out Using TGIN Twist and Define Cream

Chris-Tia from Thank God I'm Natural sent me a bundle of products a while back which I've been using slowly and loving. I don't usually experiment a whole lot with new products because I kind of have my tried and true, but if I could (afford it...) I totally would more! 

People love her Buttercream Daily Moisturizer -- I actually gave mine to my little sister who loves it on her curly hair after she asked if she could keep it. She liked the twist and define cream, too, but didn't want to steal all my products. :)

I've used this product on a wash and go as well and got good results -- so you don't actually have to twist your hair for definition when using this product but I find that it works best on twist outs. To get this look, I did a regular twist out using Giovanni Direct Leave In as a leave in and then applied TGIN Twist & Define Cream on top to lock the curls in place.

Tutorial:

November 6, 2013

Latidoe Apron Featured in Coastal Living November Issue!

Well...in a WellnessMats ad. Would be nice if we could see a little bit more of the Latidoe apron. But it's something! It's the mat they're advertising obviously...but it's pretty cool that I got to sneak in some Latidoe accessories during the photo shoot! 

November 5, 2013

Health Benefits of Turmeric Powder + Must Try Turmeric Recipes

organicindia.mercola.com

Turmeric powder is one of my favorite spices especially for the Fall. It has a subtle flavor, but what I like almost more than the flavor is it's vibrant golden hue and endless list of health benefits. It's one of the primary components of curry powder...another one of my favorites. Turmeric is more commonly used in savory dishes, especially Asian inspired dishes -- but it can also be served sweet, as in turmeric milk or ice cream! 

Health Benefits of Turmeric:

Anti-inflammatory properties
Antioxidant effects 
Can aid in body's destruction of cancer cells
Promotes a healthy heart + cardiovascular system
Lowers cholesterol


Some Must-Try Turmeric Recipes:
Recipe and image by kelliesfoodtoglow.com

Recipe and image by lakitchenette.com

Recipe and image by veggienook.com

November 3, 2013

5 Favorites of the Month

LOVE THESE:

Derek Cardigan 7011 Ice Frames
First pair free from coastal.com -- they have a good selection of fun frames, worth a shot since you only pay for shipping!

Maybelline Dream Fresh BB Cream
I've been using this + powder instead of foundation lately. It's a lot lighter and better for your skin, less breakouts. It also blends easier...saving me a few minutes every morning.

TGIN Honey Miracle Hair Mask 
Chris-tia sent me a package of sample TGIN products -- I recommend them all. But my favorite would have to be her TGIN hair mask. It's ridiculously moisturizing as either a conditioner or mask. I use it both ways (I actually ran out...need to get more asap).

Thrifted Silver Bangle
I got this for $3 at a Value World. Good buy. 

Pecksniff's England Gardenia & White Peach Dry Body OilThis is a spray on all-purpose "dry" moisturizer. It's a very light weight oil. I've been using it as a sealant on my hair and as a moisturizer on dry skin (knees, elbows, + feet...). I've never heard of this company before but saw it in a store and thought I'd try it. I love the packaging, too...

November 1, 2013

Fluffy "2nd Day" Wash + Go with Giovanni Direct Leave-In and EcoStyler

My favorite wash and go combo lately has been EcoStyler + Giovanni Direct Leave in. It's so basic...but it never fails. And both products are super affordable...Giovanni under $10, EcoStyler under $5. And a little goes a long way for both products. 

I like the combo because it gives a fairly decent hold (I can usually get 3+ days out of a style) and it is super soft. Definitely the softest and least crunchiest combo I've ever tried. Even softer than curl creams/milks/puddings. I also like this combo because it doesn't leave my hair so greasy. 

It does probably increase dry time, though. So I usually sit under a hooded dryer for around 30 minutes the night before and then style it the next morning when it's thoroughly dry. If you wait to tension blow dry (tutorial here) until your hair is completely dry, it will be the most defined and the most limp. If you want fluffier, closer-to-second-day hair (like my pictures below) then dry your hair until it's about 85-90% dry and then tension blow dry on slightly damp hair. The dampness will naturally bring out a bit of frizz for a more bouncy, fluffy, untamed look.

You'll need:
Giovanni Direct Leave In
EcoStyler Gel
Brush for detangling

This is how my hair looks completely wet. This is after detangling and adding product. First I sectioned into around 4-6 parts, applied a small amount of leave in to each section and detangled. I applied a modest amount of ecostyler on top of the leave in to each section as I went. The more EcoStyler you use, the more tight and defined your curls will be. But don't use too much or you might have some crunchiness and flaking. 

This is my hair about 85% dry after sitting under my hooded dryer. To fluff it out, I used the tension blow drying method. Which means separating hair into multiple sections, and pulling smaller strands of hair taut while blow drying the hair. Don't tension blow dry too long on each section or you'll have a blow out. You just want to stretch the curls a bit, not straighten them. 

The Results:


The Next Day:

To preserve the curls, I pinned my hair back and covered it with a wig cap, actually. This just secured the hair in place to avoid friction from tossing + turning in my sleep...the next morning, I sectioned it into roughly 4 sections and very loosely and briefly blew it out using blow dryer on my roots to give my hair its shape again. 

As you can see, the curls are not perfectly defined because my hair was still somewhat damp when I tension blow dried This gives the illusion of 2nd or 3rd day hair because it's not as perfect. Which I kind of like! 

October 29, 2013

Some Fun Etsy Finds of the Day

I was browsing through Etsy (like I do almost everyday...) and thought I would share my favorite finds. I have yet to update + renew my etsy shop...I will get it together soon. Promise. Browsing through everybody else's Etsy shops will hopefully motivate me to get going again with mine!

October 28, 2013

Lazy Day + Second Day Twisted Crown Natural Hair Style

This is my go-to lazy day style for when I want to "do" my hair...but don't have the time...Or for when my hair is too messy to wear out but it's not wash time yet.

You know your hair is looking crazy when you're about to go out on a Friday night and your friend who is going out with you asks you (in the politest way possible...) what you're going to do with that hair. 

Which is what happened to me on Friday. Lol. So...to save the mess of hair that was the result of going nearly an entire week wearing my hair in a bun--without touching it or doing it once...except to occasionally add more bobby pins to flyways...I spritzed it and put in curl formers. (You can see my curl formers on dry hair results that I posted a while back here). 

And that night it looked cute after taking out the curlformers--except the next day...after sleeping on it without wrapping it or twisting it...it looked crazy again. Like this:

Second Day Hair I Started With:

So to salvage the look so I wouldn't have to wash it...I did my go-to lazy hair day style. I'm not sure what to call it...but it's basically purposefully messy french braids + a braided bang. Except instead of braids, I did two strand flat twists. I am not good at braiding at all, but this style is meant to look kind of messy-cute and effortless which is why it works for people like me who can not braid for their life. 

Tutorial:
First, loosely side part your hair and continue the part all the way down into two halves (it's ok if they're uneven). You don't need a perfect part, just part your hair loosely with your fingers. Then, start with a small strand of hair on the lesser side of the side-part and flat twist all the way down to the back of your neck picking up strands of hair as you go. Secure the twist with a clip. 
Then, you'll want to pull all of your bangs forward. Start with a small strand of hair and twist loosely while pulling the hair down your forehead a bit to create a bang. If you don't want bangs, you can twist closer to your scalp. 
Keep twisting and picking up strands all the way around until you reach the back of your neck and meet the end of the first twist. Then take out the clip and twist the two ends together. Roll the twisted ends up and tuck the hair into itself. Pin the ends in place with a few bobby pins. 
To give the style a more messy carefree look, pull out a few small curls around your ears and neck. To make the bangs fuller, I pull apart some of the twists along my forehead and bobby pin them down as needed. If some of the hairs on the crown of your head didn't make the twists, you can also tuck in loose strands into the twists and pin them in place. 

The Result: 
(Front and back)
I like this style because it's a good solution for crazy second or third (or fourth...) day hair when you don't just want to put it in a bun. It takes 5-10 minutes to do and it's totally ok if it's messy (or if you can't braid).

October 27, 2013

Latidoe Apron Featured in a WellnessMats Ad in the New York Times! #AlmostFamous


This is kind of cool! Too bad my etsy store is down at the moment. I will have to update it and post all my aprons up -- and everything else I have ready made. Especially now that the holidays are coming up...one of many things on my to do list this week: update store. Now. 

And if you stand in kitchens a lot...I recommend looking into WellnessMats here

October 26, 2013

My Clear Skin Facial Regimen for Under $30


These are all of the (inexpensive) products that I use on a regular basis on my face -- and that actually help keep my skin moisturized and clear. I like to keep things minimal and simple so I rarely splurge on facial products -- though I don't mind to every now and then. I just find that oftentimes, when I do splurge on more expensive fancy products, that they don't really work all that much better (if at all better) than the less expensive products.

My Day Routine:

In the morning, I wash my face with the Neutrogena facial bar and then moisturize generously with Trader Joe's Enrich. I don't use the toner very often...but if you have dark spots then I'd suggest using the ACV toner daily. You can also make your own toner using diluted Apple Cider Vinegar. I like the Terra Cotta Paste ACV Toner by Leanne R. Designs because it's already diluted and smells way better than regular ACV because she adds a bit of oils. 

My Night Routine:

At night, I wash my face with the Neutrogena facial bar and then moisturize lightly with the Trader Joe's Enrich facial lotion. I then use the CVS brand Benzoyl Peroxide (because it has the same amount of concentration of the active ingredient but is cheaper than Clean + Clear or other brand names...) and smooth it over the problem areas of my face. This stuff dries out your skin, so if you have dry skin use sparingly only on affected areas. If you have oily skin you can get away with applying a thin layer lightly over the entire face. I apply it based on how dry my skin is. I only use this at night.

Once or Twice a Week:

Only once or twice a week I may exfoliate using either a scrub or a mask. Lately I've been using the Moroccan Red Clay because it feels a bit more luxurious -- ha. But a scrub works fine as well. I like the St. Ives scrub because it has acne fighting properties while also being gentle and smelling nice. 

October 24, 2013

DIY Baby Peter Pan Costume

Today I helped my cousin make this DIY Peter Pan costume for her baby/my baby cousin. Complete with the feather-in-hat, belt, and sword. Just add tights. It's not totally finished yet...and baby has yet to try it on...but so far so cute!

We got the pattern idea from Make It & Love It. We didn't stick to her pattern exactly...and probably used a little bit less effort...(ours is sew-less, and involves hot glue)...but I think it was a success. No idea what I'll be...but at least baby does.

October 21, 2013

Jo Malone London Unisex Cologne Five Piece Gift Set


This was a spontaneous buy...and I really like it! I like the whole line of Jo Malone fragrances in general because they are simplistic but interesting and are made for layering. Mixing and matching is always fun because you get more options and I also like that most of the fragrances are meant to be unisex. My boyfriend and I actually bought this together and plan on sharing it...haha.

This set comes with five 0.3oz bottles of assorted colognes -- I think all of which are top sellers. The box includes: Amber & Lavender, Lime Basil & Mandarin, English Pear & Freesia, Blackberry & Bay, and Peony & Blush Suede and was $100 + tax (with the help of a couple gift cards...).  


As you can see, the packaging is super cute. Which makes sense...as it's supposed to be a gift set. It was hard to open the box...lol. I also like the look and feel of the bottles themselves -- very minimal and fitting to both men and women.


The Fragrances:

I am in no way a cologne expert...I looked up information on the notes from fragrantica.com:


Amber & Lavender
Notes: bergamot, lavender, mint, lily-of-the-valley, clove, cinnamon, myrrh, patchouli, amber

This one is my favorites (along with Lime Basil & Mandarin). It still passes as unisex, but does have more of a masculine feel to it -- it was made for Jo Malone's husband. I can definitely smell the amber in it -- it's a bit darker and heavier of a scent then the others and smells very distinct.


Lime Basil & Mandarin
Notes: lime, mandarin orange, bergamot, basil, lilac, iris, thyme, patchouli, vetiver

I think this is the most unique scent of this set. Even though it has a fruitiness to it, I think the basil adds an earthiness that tones down the fruitiness a lot. It's my favorite of the set next to Amber & lavender and I think this one is a tiny bit more on the masculine side but still very appropriate for women -- it just not "girly". 


English Pear & Freesia
Notes: freesia, pear, quince, wild rose, rhubarb, patchouli, amber, white musk

This cologne was one of my boyfriend's favorites. It's very fresh and a mix of floral and fruity but I think mostly floral. This one is a bit more feminine than masculine I would say and also one of the lighter scents -- a bit summery. 


Blackberry & Bay
Notes: grapefruit, floral, vetiver, cedar, blackberry, bay leaf

This one was also one of the boyfriend's favorites. To me, it was the darkest of all the fragrances in the set. Probably because of the blackberry. If deep purple had a smell...this might be it. Lol. I think this one would also be a good one to layer--especially if you wanted to town down a fruitier, lighter scent. 


Peony & Blush Suede
Notes: red apple, peony, jasmine, carnation, rose, suede

I feel like compared to the other fragrances, this one is the most classic. I think it's good for most occasions and is very feminine and floral. It's a very pretty, light, and happy scent. I think a lot of lines have a fragrance somewhat like this one.