
 |
| Photo Credit: wollowbirdbaking.com |
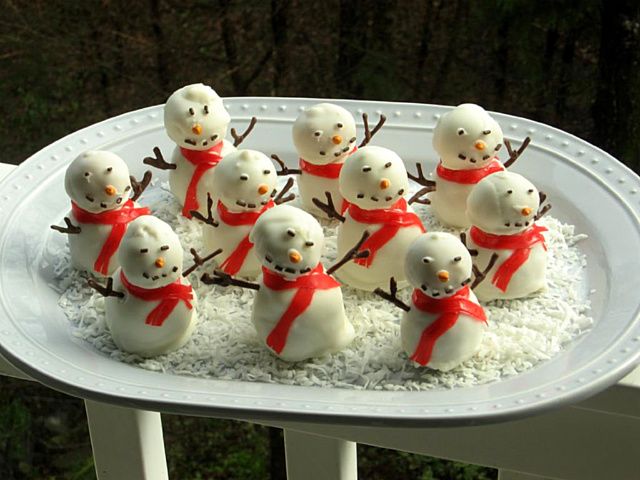
Oreo Truffle Snowmen
Recipe By: Willow Bird Baking
Ingredients:
2 packages golden oreo cookies
2 8-ounce package cream cheese (softened)
white candy coating or candy melts
Decorations:
multicolored or chocolate sprinkles
candy-coated chocolate kiss sprinkles
strawberry fruit roll ups (or fruit by the foot)
chocolate (for melting)
Directions
2 packages golden oreo cookies
2 8-ounce package cream cheese (softened)
white candy coating or candy melts
Decorations:
multicolored or chocolate sprinkles
candy-coated chocolate kiss sprinkles
strawberry fruit roll ups (or fruit by the foot)
chocolate (for melting)
Directions
1. Finely crush all but 14 cookies in a food processor or place them in a ziploc bag and crush into a fine consistency. Note: As for the extra 14 cookies, just eat them. Or, if you have extra dipping chocolate, make some chocolate covered oreos.
2. Stir in softened cream cheese. Use the back of a large spoon to help mash the two together.
3. Roll the mixture into 2″ balls (for the bodies) and 1″ balls (for the heads) and place on a cookie sheet covered with wax paper. Make sure you have enough heads for your bodies!
5. It helps to put the uncoated balls in the freezer for a few minutes to keep the mixture from starting to fall apart when you drop into the melted chocolate. Note: I refrigerate mine for an hour or two in lieu of the freezer. I’ve heard folks say that if they get too cold, they can crack.
6. Melt candy coating as directed on package and then dip balls one at a time into candy coating. Let excess coating drain off onto wax paper covered cookie sheet to dry. Note: Dipping is often the most difficult part. Find what works for you. Let your kitchen be your playground. Look through your utensils for useful tools, and be creative. I used a grill fork to hold my “bodies” while spooning coating over them, and then redipped the bottoms separately. For the heads, I usually skewered them with a toothpick, dipped them, and then wriggled them off onto the wax paper after draining excess coating.
7. As soon as each body and head is dry (which usually only takes a couple of minutes) transfer it to the refrigerator immediately to prevent cracking/oozing. If it does crack, blot with a paper towel, redip, dry, and then refrigerate.
Decorating
1. Take a head and body out of the fridge, and “glue” them together using melted candy coating (I used a sharp paring knife here to whittle away some of the excess coating around the bottom of the heads).
2. Use melted coating to “glue” on chocolate sprinkles for eyes, mouth, and buttons if desired. “Glue” on an orange candy-coated chocolate sprinkle (or a regular orange sprinkle) for a carrot nose.
3. Cut a strip of strawberry fruit roll up, and snip “fringe” into each end. Wrap around snowman’s neck and “glue” together with melted candy coating.
4. Melt chocolate and pipe out tree branch arms. Using a bamboo skewer or a toothpick, carve out a hole in each side of the snowman. Gently slide a “branch” into each hole to serve as arms.
4. Refrigerate snowmen in an airtight container.
 |
| Photo Credit: marthastewart.com |
Black Bottom Coconut Bars
Recipe By: Martha Stewart
Ingredients
For Chocolate Base:
- 1/2 cup (1 stick) unsalted butter, plus more for pan
- 1/2 cup sugar
- 1/4 teaspoon salt
- 1 large egg
- 1/4 cup unsweetened cocoa powder
- 1/4 cup all-purpose flour (spooned and leveled)
For Coconut Topping:
- 2 large eggs
- 3/4 cup sugar
- 1/2 teaspoon vanilla extract
- 1 cup all-purpose flour, (spooned and leveled)
- 1 package sweetened shredded coconut (7 ounces), 1/2 cup reserved for sprinkling
- Directions
- 1. For chocolate base: Preheat oven to 375 degrees. Line a 9-inch square baking pan with aluminum foil, leaving a slight overhang; butter bottom and sides of foil (not overhang).
- 2. Place butter in a large microwave-safe bowl; melt in microwave. Add sugar and salt; whisk to combine. Whisk in egg, then cocoa and flour until smooth. Spread batter in prepared pan.
- 3. Bake just until sides begin to pull away from edges of pan, 10 to 15 minutes (do not overbake). Let cool slightly while preparing coconut topping. Keep oven on for topping
- 4. For coconut topping: In a medium bowl, whisk eggs with sugar and vanilla. Gently mix in flour and coconut (except 1/2 cup reserved for sprinkling).
- 5. Drop mounds of mixture over chocolate base; spread and pat in gently and evenly with moistened fingers. Sprinkle with reserved 1/2 cup coconut.
- 6. Bake until golden and a toothpick inserted in center comes out with moist crumbs attached, 25 to 30 minutes. Cool completely in pan. Lift cake from pan, peel off foil, and cut into 24 bars.

Photo Credit: imsofunny.blogspot.com
Holly Wreath CookiesRecipe By: My Life as a Domestic Artist
Ingredients1 Cube Real Butter
1 Bag Large Marshmallows
1/2 tsp Vanilla Extract
1/2 tsp Almond Extract
6 cups corn flakes
Lots of green food coloring
Red Hots if desired
DirectionsFirst make sure you grease a few large pieces of wax paper prior to preparing cookies. We use Pam to spray the wax paper but mom always used butter or margarine.
In a large stock pot melt the butter. Add marshmallows, vanilla and almond extracts and stir until all marshmallows are melted. Be careful to not burn the mixture. Remove from heat and add green food coloring to bring mixture to a forest green color. It takes quite a bit but it definately looks better than avacado green when you use just a little.
When mixture is a good shade of green add the corn flakes. Fold the flakes into the mixture to avoid crushing the flakes. When flakes are sufficiently green scoop out approxiamtely 1 1/2 cups of flakes onto wax paper. Have kids rub their hands with butter and form the flakes into wreath shapes. Add red hots and let cool.

Photo Credit: buddingbaketress.blogspot.com
Peanut Butter Reindeer CookiesRecipe by: Baker Girl
Ingredients:3/4 cup peanut butter1 1/4 cup firmly packed brown sugar1/2 cup shortening3 tablespoons milk1 tablespoon vanilla1 egg1 3/4 cup all-purpose flour3/4 teaspoon baking soda3/4 teaspoon saltChocolate-covered mini pretzelsMini brown M&MsRegular-sized red M&Ms
Directions:
Preheat oven to 375°F.
Combine brown sugar, peanut butter, shortening, milk, and vanilla in large bowl. Beat at medium speed until well blended. Add egg; beat until just blended.
In a separate bowl, combine flour, baking soda, and salt. Add to creamed mixture at low speed. Mix just until blended.
Form dough into 1-inch balls. To make reindeer-shaped cookies, pinch the bottom of the ball slightly to form a point, then gently flatten with your hand. Space cookies about 2 inches apart on a greased cookie sheet and bake for 7 to 8 minutes, until set or just beginning to brown.
Remove from oven and immediately (and gently) press two mini pretzels into the tops of the cookies for the reindeer's antlers. Press two mini brown M&Ms in for the eyes and one red M&M for the nose (or any other color... some of mine ended up with green noses. They might be South Pole reindeer.).
Allow to cool 2 minutes on the baking sheet and then transfer to a wire rack or paper towel to cool completely.
Makes about 40 reindeer cookies.


 |
| -doe |

No comments:
Post a Comment
Any insight?